
Operating a mini excavator is hassle-free. So, if you’re planning to hire a machine sometime soon but have never experienced how to operate a mini excavator, then you’ve come to the right place! Here, we’ve round up a series of easy-to-follow instructions on how to use the equipment’s control and immediately become skillful in maneuvering the machine.
Unlocking the "Complexity" of Mini Excavator Handling
Steering a Diggermate mini excavator is as simple as a walk in the park. Here you will see that mastering the controls is easy and quick. Yup! We’re not kidding!


Know more about the mini excavator parts
Before we begin, it is important to note that people take interest in operating a mini excavator because of two factors. First, one might want to learn because of DIY projects such as landscaping, pool digs, or fencing. Second, one might want to advance the skills to open a business. In this regard, Diggermate franchise and you can fill the form here.
So, to start the learning process, it is extremely important for you to learn about the various controls of the machine. Moreover, you have to know where they are located and what their individual functions are.
With that, you have to keep these in mind:
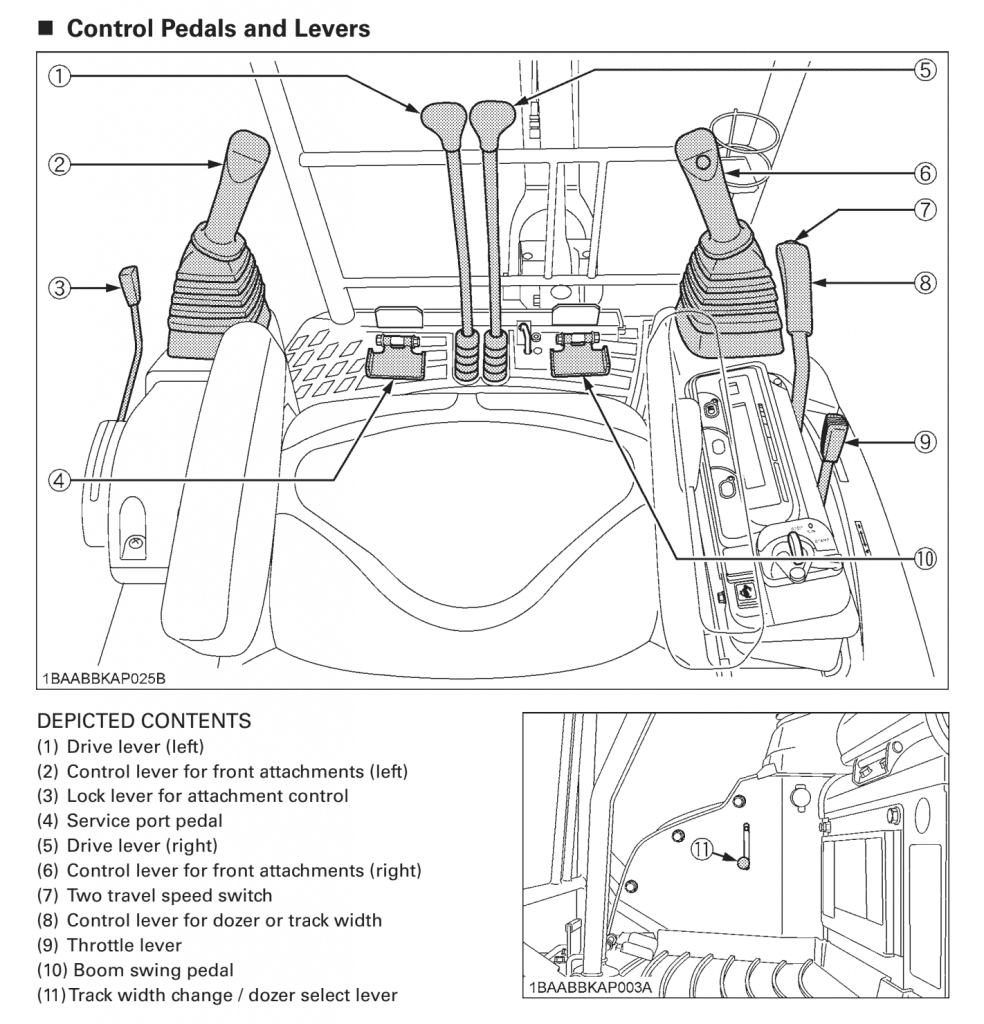
Switches and Levers
- Starter switch – located at the right side of the seat, right beside the seat belt latch.
- Lock lever for attachment control – referred to in the video as “Safety”; the red-coloured controller located at the left side of the seat.
- Throttle Lever – referred to in the video as “Accelerator”; the black controller on the right side located right after the starter.
- Drive levers – the levers positioned in between the foot pedals found directly in front of your seat.
Control Levers
- Control lever for front attachments (right) – aka the right Joystick; positioned directly on the right side of the seat; move left and right to scoop and dump function and then move forward and backward for the up-and-down-on-the-boom function.
- Control lever for front attachments (left) – aka the Left Joystick; positioned directly on the left side of the seat; move forward and back for boom in and out and move left and right to turn the machine around.
- Control lever for dozer or track width – referred to as the dozer blade controller in the video; found on the right side, beside the joystick.
Pedals
- Boom swing pedal – the right foot pedal used to swing the boom left or right.
- Service port pedal – the left foot pedal also known as the independent attachment boom; useful to turn an auger, for example, left and right. Also works for all the other attachments.
REMEMBER: Always keep the the lock lever (safety) in the correct position. To start the machine, keep the lever in an upright position. To operate the mini excavator, keep it downward. Now that this information has been cleared, let’s roll!
Here's Diggermate expert Mick Watkins showing you how to operate this little machine in 3 easy steps
Step 1: Starting the machine

Before anything else, you must turn on the machine by switching the starter located at the right side of the seat, near the seatbelt latch. Remember to keep the lock lever in upright position for this to work.
Step 2: Operating the Machine
Next, keep the lock lever down to start operating and using the various controllers.

In this case, turn on the machine by switching the starter located at the right side of the seat, near the seatbelt latch. Remember to keep the lock lever in upright position for this to work.

Use the dozer blade control lever to make it go up or down accordingly. The green button is the rabbit button or the second speed to go a little bit faster so the machine will go fast in a straight line but it doesn’t turn very well. It also helps the machine stabilise on an uneven ground.
Step 3: The Footwork

Finally for the footwork, use the right foot pedal to swing the boom left or right. In addition, don’t forget that you can use the scoop and dump function and forward-backward motion using the joysticks.
At this point, the dozer blade goes back, the joystick comes up just a little bit just to raise the bucket off the trailer, and then all the way back.
Now hop on a Diggermate machine and experience for yourself how to operate a mini excavator.
Because you already know the parts, functions, and controls of a mini excavator, it’s time to put what you’ve learned to practice. Finally you can hop on a machine and get the feel of everything.
Usually, the first hour may be a struggle. However, once you’ve familiarised yourself with the controls, you’ll be good to go. We also recommend you replaying this tutorial video as much as you can to really master the operations.
Where to book a mini excavator for hire
Here at Diggermate, booking is easy. First, you can check and book our Diggermate locations online. However, if you prefer to call the operators, you can see the contacts at the bottom of this page. Remember, when you hire an excavator, it comes with a bucket ready to go so you get a 300-, a 450-, and 1100 bucket. You get the ripper as well. The machines will come fueled and ready to go. Thus, we expect them to come back fueled and clean as much as you can.
